
Key Takeaways
- Learning how to package and ship correctly starts with a simple process: choose the right packaging, protect the item, measure accurately, pick the best carrier service, label the box, and hand it off properly.
- The right packaging depends on what you are shipping. Boxes work best for fragile or heavy items, while padded mailers are better for soft, lightweight, non-breakable products.
- Proper protection matters. Use the “2-inch rule” for fragile items, add enough filler to prevent movement, and perform the shake test before sealing the box.
- Accurate weight and dimensions help prevent unexpected shipping fees. Carriers may charge based on dimensional weight, so oversized boxes can cost more even when the package is lightweight.
- Label placement can affect delivery speed. Place the shipping label on the largest flat surface, avoid seams or folds, and keep the barcode clear and scannable.
- Choosing the right shipping service depends on budget, delivery speed, package value, and risk. For valuable items, tracking, insurance, signature confirmation, or hold-for-pickup can add peace of mind.
- As shipping volume grows, beginners and small sellers may eventually need fulfillment support to move from manual packing to a repeatable, scalable shipping process.
Introduction: De-Mystifying the Shipping Process
Shipping a package often feels like a secret language known only to logistics professionals and small business owners. For the average person, the Post Office can be an intimidating place, filled with complex forms, confusing service names, and the looming fear of an expensive mistake. The good news is that shipping does not have to be a stressful, high-stakes guessing game. By breaking the process down into a logical, five-step framework, you can move from anxiety to mastery in just a few minutes.
This guide is designed for the beginner. Whether you are shipping a birthday gift to a loved one, returning an online order, or starting a small side hustle, this process will provide you with a reliable, repeatable system. We will skip the jargon associated with high-volume, third-party logistics (3PL) firms and focus entirely on the physical and digital steps you need to take as an individual sender. By the time you reach the end of this article, you will have the confidence to prepare, label, and dispatch your packages like a true professional.
At Launch Fulfillment, shipping packages is part of our daily work. While this guide is written for beginners, the same fundamentals also apply to growing ecommerce brands: protect the product, capture accurate weight and dimensions, choose the right service, label correctly, and make sure the package enters the carrier network cleanly.
Why Shipping Doesn’t Have to Be Stressful
Shipping anxiety usually stems from the “unknowns” the worry that your package will be lost, damaged, or cost more than expected. Most of this stress vanishes once you understand the basic rules of the road. When you follow a standardized procedure, you eliminate the variables that lead to common shipping pitfalls. You aren’t just sending a box; you are managing a transaction that relies on clear communication, proper protection, and informed decision-making. By adopting a methodical approach, you transform a chore into a simple, automated task.
For ecommerce brands, this same repeatable process becomes the foundation of scalable ecommerce fulfillment services. A single package may feel simple, but thousands of orders require systems, trained teams, warehouse technology, carrier coordination, and consistent quality control.
What You’ll Need: The Beginner’s Essential Toolkit
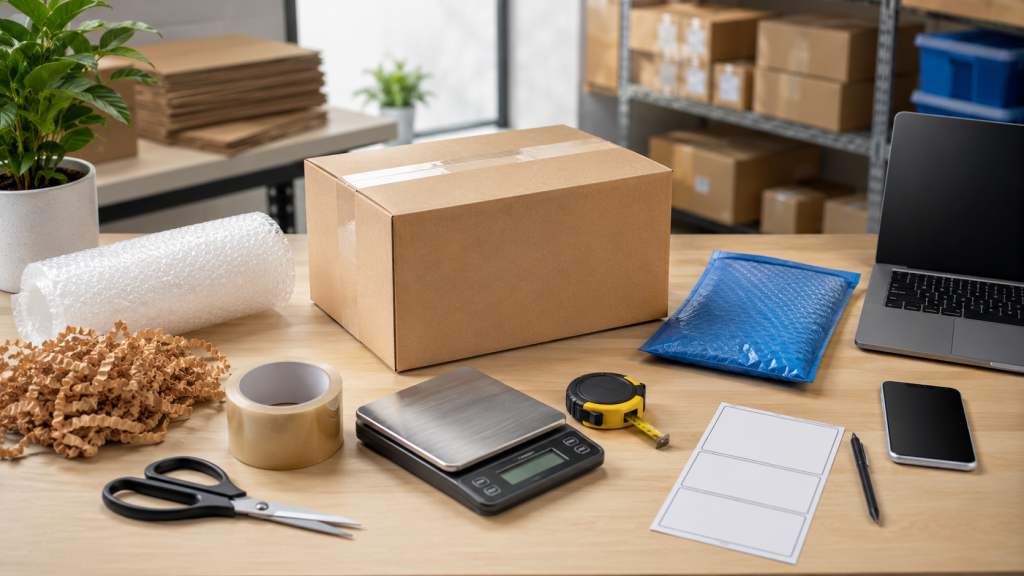
A simple shipping toolkit helps beginners pack, measure, label, and send packages with confidence.
Before you begin, gather your supplies to avoid mid-process frustration. You don’t need a warehouse, but you do need the right gear:
- A reliable scale: A kitchen scale for small items or a bathroom scale for heavier boxes is essential.
- Packing materials: High-quality packing tape, bubble wrap or air pillows, and clean, sturdy corrugated boxes.
- Measuring tool: A standard tape measure to determine the length, width, and height of your package.
- Shipping interface: A computer or smartphone to access carrier websites for printing your shipping label.
- Utility knife or scissors: To trim packaging and open boxes safely.
USPS provides a useful overview of how to prepare and send a package, including selecting a box, packing the item, addressing the package, and choosing postage. For everyday shippers, this is a helpful external reference to keep nearby.
Overview of the 5-Step Shipping Framework
The 5-step shipping framework simplifies the entire process, taking you from packing your item to successfully handing it off to the carrier.
To simplify your shipping experience, we follow this sequence:
- Prepare and Secure: Protecting your items and choosing the right box.
- Measure and Weigh: Getting accurate data for your carrier.
- Choose Service: Selecting the right carrier and delivery speed based on your budget.
- Labeling: Generating and applying your shipping label correctly.
- The Hand-Off: Dropping off the package or scheduling a pickup.
This is also the basic foundation of professional pick, pack, and ship services. The difference is that a 3PL uses warehouse workflows, carrier integrations, and order management systems to repeat those steps accurately at scale.
Shipping More Than a Few Packages?
If your side hustle or ecommerce brand is growing beyond occasional shipping, Launch Fulfillment can help you move from manual packing to professional fulfillment with accurate picking, packing, shipping, tracking, and returns support.
Step 1: Prepare and Secure Your Items
Choosing the Right Packaging: Boxes vs. Padded Mailers
The type of packaging you select depends entirely on your item’s durability and shape. Corrugated cardboard boxes are the gold standard for heavy or breakable goods because they provide rigid structural support. Padded mailers, conversely, are excellent for soft items like clothing or non-fragile accessories. Using a box for a t-shirt is a waste of money and space, while using a mailer for a ceramic mug is a recipe for disaster. Always prioritize structural integrity over convenience.
For ecommerce brands, packaging decisions also affect brand perception, shipping costs, and operational speed. Launch Fulfillment’s order fulfillment workflows help brands connect packaging choices with accurate shipping, customer experience, and margin protection.
Protecting Fragile Items: The “2-Inch Rule” and the Shake Test
If you are shipping fragile items, the “2-inch rule” is your best friend. Your item should be cushioned by at least two inches of packing material on every single side, top, bottom, and all four flanks. Once you have packed the item, perform the “Shake Test.” Gently shake the box. If you hear anything moving inside, you need more filler. If you feel shifting, the item is not secure. Adding extra bubble wrap or air pillows is significantly cheaper than replacing a broken product.
That same principle matters in professional fulfillment. If damage rates are rising, brands should look at packaging design, box strength, filler materials, carrier handling, and dunnage choices before assuming the carrier is the only issue.
Selecting Quality Packaging Materials: Tape, Bubble Wrap, and Fillers
Never compromise on tape. Use pressure-sensitive plastic packing tape specifically designed for shipping. Avoid masking tape, duct tape, or painter’s tape, as these do not adhere well to cardboard under the stress of transit. When using fillers, aim for biodegradable packing peanuts, bubble wrap, or recycled paper. Ensure that your filler material does not collapse under pressure during the journey.
The EPA’s guidance on sustainable packaging is also worth reviewing as more customers pay attention to packaging waste. The best packaging protects the product without adding unnecessary cost, bulk, or filler.
Reusing Boxes: How to Safely Remove Old Labels and Barcodes
Reusing boxes is an eco-friendly and cost-effective strategy, but it must be done correctly. The most critical step is to completely obscure all previous tracking numbers, barcodes, and address labels. If a carrier’s scanner picks up an old barcode by mistake, your package could be misrouted or returned to the sender. Use a thick black permanent marker to black out old information, or better yet, peel off the old label entirely. If the box has structural damage, dents, or tears, discard it; do not risk your items in a compromised container.
For businesses, these details are handled through repeatable order fulfillment operations, including packing standards, label placement, barcode scanning, quality control, and carrier handoff procedures.
Step 2: Measure and Weigh Like a Pro at Home

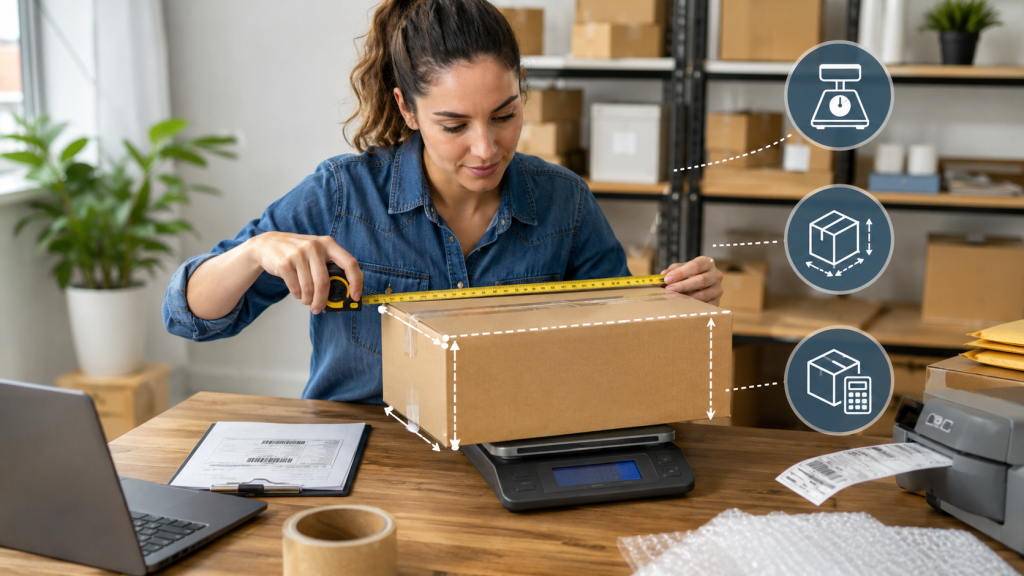 Accurate package weight and dimensions help beginners choose the right shipping service and avoid unexpected fees.
Accurate package weight and dimensions help beginners choose the right shipping service and avoid unexpected fees.
How to Use a Kitchen Scale or Bathroom Scale for Accuracy
Accuracy is the foundation of fair shipping costs. If you are shipping small items, use a digital kitchen scale for precision down to the ounce. For larger items, use a bathroom scale. To get an accurate weight with a large box, weigh yourself while holding the box, then subtract your own body weight. Round up to the nearest ounce or pound to ensure you are not under-paying, which can lead to “postage due” charges for the recipient.
In ecommerce fulfillment, accurate weights are even more important because a small error can repeat across hundreds or thousands of packages. This is one reason many brands eventually move to a technology-enabled warehouse management system and professional packing workflows.
Measuring Dimensions: Length, Width, and Height
Use a standard measuring tape to measure the exterior of your box. Always round up to the nearest whole inch. Carriers calculate shipping costs based on the footprint of your box, and being off by even a fraction of an inch can result in unexpected surcharges. Record these dimensions clearly, as you will need them when entering data into your carrier’s website.
UPS also explains how package dimensions affect shipping fees and why shippers should use accurate package dimensions to avoid extra charges. If you are shipping regularly, dimensions should become part of your standard packaging checklist.
Understanding Dimensional Weight: Why Size Matters as Much as Heaviness
Many beginners are surprised to find that a large, light box costs more to ship than a small, heavy one. This is because carriers charge based on “dimensional weight.” They take up valuable space in a truck or plane, and carriers want to maximize their space efficiency. If your box is unnecessarily large, you are paying for empty air. Always choose the smallest possible box that safely fits your item to avoid these “DIM weight” penalties.
Launch Fulfillment’s dimensional weight calculator FAQ can help ecommerce brands understand how box size, actual weight, and billable weight affect shipping costs.
Address Validation: Ensuring Your ZIP Code and Standards are Correct
An incorrect address is the leading cause of delivery failure. Always double-check the recipient’s ZIP code using the official USPS ZIP code lookup tool. Ensure that the address format follows standardized carrier requirements. A small typo in the street name or city can cause a massive delay in your delivery, so verify the details with the recipient if you have any doubts.
Before buying postage, use the USPS ZIP Code lookup tool to confirm the address. For ecommerce brands, address validation also helps reduce delivery exceptions, correction fees, delayed orders, and avoidable customer support tickets.
Step 3: Choose the Right Shipping Carrier and Service
Comparing the “Big Three”: USPS vs. FedEx vs. UPS
The “Big Three” carriers operate differently. USPS is generally the most cost-effective for small, lightweight packages and offers the unique advantage of delivering to PO boxes. UPS and FedEx are often preferred for time-sensitive, heavy, or high-value shipments where tracking granularity and reliability are paramount. If you are shipping a gift, USPS Ground Advantage is often your best bet. If you are shipping an expensive electronic item, a tracked, insured service through UPS or FedEx might provide more peace of mind.
For ecommerce companies, carrier selection should be part of a broader ecommerce shipping services and solutions strategy. The best option depends on package size, destination, delivery promise, value, weight, and customer expectations.
USPS Ground Advantage vs. Priority Mail: Speed vs. Budget
USPS Ground Advantage is the go-to for standard, budget-conscious shipping. It is slower but significantly cheaper. Priority Mail is the faster, premium alternative that includes some insurance coverage and faster transit times. If the package needs to arrive within three days, go with Priority Mail. If time is not a factor, choose Ground Advantage to save money.
If you are comparing shipping services for a business, make sure you also understand shipping zones. Distance can change both cost and transit time, especially as order volume grows.
The Flat-Rate Secret: When is Priority Mail Flat Rate Actually Cheaper?
Priority Mail Flat Rate boxes are a godsend for heavy items. Because the price is based on the box size rather than the weight, they are the cheapest option for sending heavy, dense items like books or canned goods. If your box weighs over three or four pounds, compare the cost of a standard box to the Flat Rate price. Often, the Flat Rate box will save you a substantial amount of money.
For brands shipping many orders, flat-rate shipping should be compared against negotiated carrier rates, package optimization, regional carrier options, and total shipping and handling costs.
Delivery Options: Selecting Speed and Signature Requirements
Think about the value of your package. If you are shipping an item worth over $100, require a signature upon delivery. This prevents “porch piracy” and ensures that the package is handed directly to a person. You can also select “hold for pickup” if the recipient cannot be home during the day, which adds an extra layer of security for high-value goods.
USPS provides details on domestic shipping options through mail and shipping services, including different service levels and delivery choices. Beginners should match the service to the item’s value, deadline, and risk level.
Step 4: Generate and Apply Your Shipping Label
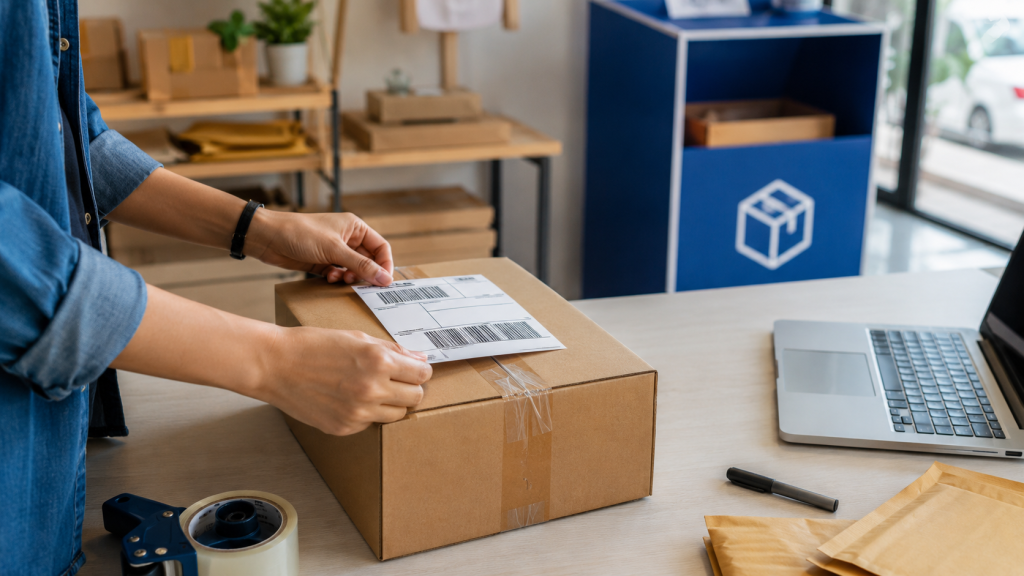 Correct label placement and a clean carrier hand-off help packages move through the shipping process without delays.
Retail Counter vs. Online Shipping: How to Get Commercial Rates
Correct label placement and a clean carrier hand-off help packages move through the shipping process without delays.
Never walk into a post office or carrier store to buy postage at the retail counter. Retail rates are significantly higher than the commercial rates available online. By generating your label at home, you can save anywhere from 15% to 50% compared to the price you would pay at the service desk. Most carriers provide free tools on their websites to generate these discounted labels.
USPS offers online shipping tools that allow senders to print postage and manage shipments digitally. For businesses, that same concept becomes more advanced through shipping software, carrier integrations, and fulfillment platforms.
Using Shipping Software and Platforms to Save Money
If you ship frequently, platforms like Shippo or Pirate Ship offer deep discounts and consolidate carrier options into one dashboard. These services allow you to compare rates side-by-side, which is much faster than checking three different websites. For the beginner, these platforms are intuitive and provide a streamlined, professional experience that mimics what large eCommerce businesses use.
Once order volume increases, shipping software should connect to inventory, fulfillment, returns, and customer communication. That is where a partner offering 3PL fulfillment services can help replace manual work with scalable systems.
Printing Your Label: Standard Inkjet vs. Thermal Label Printers
You do not need a fancy thermal label printer to start shipping. A standard inkjet or laser printer works perfectly fine. Simply print the label on a standard sheet of printer paper and use clear shipping tape to adhere it to the box. If you plan on shipping regularly, a thermal printer is a great investment because it eliminates the need for ink and tape, but it is not a requirement for beginners.
For ecommerce brands, label printing is usually built into a connected fulfillment process where orders sync automatically, labels are generated quickly, and tracking numbers flow back to the customer.
The Golden Rule of Label Placement: Avoiding the Tape-Over-Barcode Mistake
Place your label on the largest, flat surface of the box. Never place the label over a seam or a fold, as this can make the barcode difficult for automated scanners to read. Most importantly, never tape over the barcode itself. The reflection from the clear tape can obscure the scanner’s reading, causing the package to be kicked out of the automated process and handled manually, which creates delays.
Barcode accuracy is one of the reasons warehouse teams rely on scanning workflows and quality checks. Launch Fulfillment’s fulfillment warehousing facilities are designed to support accurate receiving, storage, picking, packing, shipping, and tracking.
Ready to Stop Packing Every Order Yourself?
Manual shipping works when volume is low. Once orders increase, Launch Fulfillment helps ecommerce brands move into a scalable fulfillment operation with warehouse storage, order processing, pick and pack, shipping, returns, and inventory visibility.
Step 5: The Final Hand-Off: Drop-Off or Pickup
Dropping Off at the Post Office or Carrier Store
Once your label is printed and secured, drop your package off at the designated carrier’s location. You can usually bypass the line if the package is already labeled and ready to go. Simply place it in the designated drop-off bin. This is the fastest way to get your package moving.
For businesses, the hand-off step becomes part of the daily carrier pickup or freight workflow. A reliable third-party logistics services partner helps coordinate these handoffs so orders do not sit in the warehouse after they are packed.
Using Self-Service Kiosks to Skip the Line
Many Post Office locations have self-service kiosks in the lobby. You can use these to weigh your package, confirm the postage, and print a receipt. This allows you to skip the long customer service lines entirely. It is a fantastic option if you are unsure about the weight or want to verify that your label is correct.
For beginner shippers, kiosks are a helpful middle ground between fully online shipping and counter service. They also help reinforce the habit of confirming weight, service, and label details before the package enters transit.
How to Schedule a Package Pickup from Your Front Door
If you cannot leave the house, most carriers offer free residential pickup. You can schedule this via their website, providing the number of packages and their approximate size. Just ensure the packages are left in a secure, visible location. This is the ultimate convenience for anyone who does not have time to drive to a shipping center.
USPS allows senders to schedule a pickup for eligible packages. This can be especially useful for small sellers who are still shipping from home but need a more convenient way to get packages moving.
Obtaining a Lodgement Receipt for Peace of Mind
Always request a receipt when dropping off your package. This is your “lodgement proof”, the official documentation that the carrier has accepted the package into their system. If the package goes missing, this receipt is the only evidence you have to start a claim. If the carrier does not offer a scan at drop-off, make sure you take a photo of the package with the label visible as a secondary record.
For ecommerce brands, this proof-of-handoff concept scales into tracking records, shipment events, carrier scans, and customer notifications. Strong order management and order processing help ensure every package can be traced after it leaves the warehouse.
Final Thoughts
Shipping your first package might feel daunting, but it is a process defined by predictability and preparation. By securing your items properly, choosing the right carrier, and printing your labels at home, you shift from being a confused novice to an efficient, informed sender. Remember the core principles: use the smallest box necessary to avoid dimensional weight fees, always obscure old barcodes, and choose the most cost-effective service for your timeline.
As you become more comfortable, you might explore platforms that help you manage higher volumes, or perhaps you will see the value of 3PL services if your hobby turns into a business. However, for now, focus on mastering these five simple steps. By treating every package with the same level of care and following this checklist, you ensure that your items arrive safely, on time, and at the lowest possible cost. Take the first step today by gathering your supplies; your confidence will grow with every successfully delivered package.
When shipping becomes a growth bottleneck instead of an occasional task, Launch Fulfillment can help. Our 3PL partner advantage gives ecommerce brands the warehouse network, integrations, inventory visibility, shipping support, and fulfillment operations needed to scale with confidence.
Turn Shipping From a Chore Into a Scalable System
If your ecommerce brand is spending too much time packing boxes, buying labels, and managing carrier handoffs, Launch Fulfillment can help you create a faster, cleaner, more reliable fulfillment operation.
FAQ: Assembly Services Vs Kitting
What is the difference between kitting and assembly?
Kitting groups finished products together into one customer-ready package, bundle, or SKU. Assembly combines separate components to create or complete a functional product. In simple terms, kitting is usually a fulfillment and merchandising workflow, while assembly is more of a product preparation or production workflow.
What is kitting and assembly?
Kitting and assembly are value-added fulfillment services that help ecommerce brands prepare products before they ship. Kitting usually involves grouping multiple finished items, such as a subscription box or promotional bundle. Assembly involves putting parts, components, or materials together so the final product is ready for packing, shipping, or sale.
What is an example of kitting?
An example of kitting is a skincare brand combining a cleanser, serum, moisturizer, product insert, and branded packaging into one routine kit. Another example is a subscription box where several finished products are packed together and shipped as one customer-ready order.
What is an example of kitting in a warehouse?
In a warehouse, kitting might involve picking multiple finished goods from inventory, placing them into a branded box, adding inserts or samples, scanning the completed kit, and storing or shipping it as a new SKU. This helps brands fulfill bundles, promotions, retail kits, and subscription boxes more efficiently.
What does assembly mean in a warehouse?
Assembly in a warehouse means combining components, parts, packaging, or product materials before the item is ready to ship. This may include attaching accessories, inserting components, preparing retail displays, applying labels, checking product quality, or completing light product prep.
Is kitting considered manufacturing?
Kitting is usually not considered manufacturing because it does not typically create a new functional product from raw materials or components. Instead, it groups finished goods into a sellable bundle or package. However, kitting can support manufacturing, retail prep, and fulfillment by making products easier to store, sell, and ship.
What is the difference between kitting and fulfillment?
Fulfillment is the full process of receiving inventory, storing products, picking orders, packing shipments, and sending them to customers. Kitting is one specific fulfillment service within that larger process. It focuses on grouping multiple items together before they are stored, sold, or shipped as one unit.
